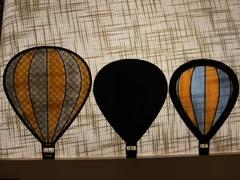
I wanted to make a hot air balloon shape and use my new PETG Translucent filaments for it. The design was a success; the printing... I gave up (for now) trying to find the right combination of settings.
Design
I'm still getting started with 3D modeling, so, with a developer's background, I worked with GitHub Copilot to scaffold and then tweak a hot air balloon via OpenSCAD. I had it base the balloon shape off of the Lindstrand A series which has a traditional shape. I iterated with a series of prompts, summarized as:
- Create a hot air balloon shape modeled after this Lindstrand 90A line drawing outline of an envelope.
- Add a vertical lines to produce 6 visible gores. Inside the gore outlines should be individual shape objects which can be colored independently. Use configurable ratios so I can control the dimensional 3D bulge perspective.
- Add a narrow Nomex band along the bottom, then add a basket shape.
All things considered, it did pretty well. I had some general instructions to keep it strongly parameterized so I could tweak things, and it probably helped that I used proper terms (like gores) and was pretty detailed in what I expected.
Turns out, the design of the model was easier than printing...
Figuring out the correct printing settings turns out to be a bit of work. Still in progress, in fact.
First, in Bambu Studio I quickly updated the filament colors to the PETG Transparent, then used the paint tool to alternate the default orange color with blue. Easy enough. Click print. Then I learned... paint does not automatically fill the entire color, just the surface; so the top-side ended up multicolored, but the back was all default orange. Also, translucent means you get to see the inner layer that you don't normally see and, apparently, the black perimeter color was used for infill.
Next, I actually researched translucent settings and found the official  Printing Tips page with a bunch of good recommendations for nicer-looking translucent printing. After updating those settings and making sure I correctly painted both sides, it was time to print. Then I learned... (again) paint does not automatically fill the entire color. This time, instead of criss-cross black infill, there was a whole layer of it and I had a fully darkened balloon.
Next, I tweaked some settings to increase how many layers of a given color must be printed (so the blue/orange correctly applies front thru back), but I got stuck figuring out why the black perimeter was bleeding into the middle layers. By now I had learned to take a closer look at the slicing results and inspect all of the layers to figure out what was going to happen in the middle. Regardless, after a lot of time investigating, I gave up, and went ahead and printed with the incremental progress.
Oh, well; it's a problem for another day.
Comments